Designer Undercounter (DEU) Door Panels
Topics:
- Designer Undercounter (DEU) stainless steel panel installation instructions
- Undercounter refrigeration and Wine Storage custom panel installation
- Instructions to install stainless panel
- Can the Designer DEU door panels be adjusted up and down or left to right?
- Can the door be adjusted for DEU units?
- How to adjust Sub-Zero Designer Undercounter Refrigeration doors
- Part numbers # 9028513, 9028514, 9028515, 9028543, 9028544, 9028545, 9028546, 9028547, 9029025, 9029026, 9029028, 9029029, 9029031, 9029032, 9029034, 9029035
Answer:
Stainless Steel Panel Information
- Stainless steel panels are available through an authorized Sub-Zero dealer.
- Stainless steel panels include a stainless steel kickplate cover.
- The stainless steel kickplate cover can be ordered separately using part number 7042782.
- Stainless steel panels are 3/4" thick.
- The outdoor model requires the use of a Sub-Zero stainless steel outdoor accessory panel.
- The outdoor panels have horizontal grain to match Wolf outdoor products.
- If installed inside, the outdoor panels will not match other Sub-Zero products.
Contact a Local Dealer for further sales information.
Custom Panel Information
If using a custom panel, both a custom door panel and handle hardware must be installed.
- A 5/8" (16) minimum to 3/4" (19) maximum thick panel is required.
- Panels thicker than 3/4" cannot be used. Thicker panels will cause interference during the door opening process and at the fully open position.
- Panels can be made taller, provided they do not exceed the maximum panel weight. Refer to Increase Custom Panel Size for more information.
- For 24" units, the panel cannot exceed the maximum panel weight of 22 lb (10kg).
- The depth of each model is 23 1/8" (587). Allow for panel thickness when planning the finished opening depth.
- Minimum 1/8" (3) reveals are required.
- Standard panel dimensions accommodate a 4" toekick.
- Refer to Designer Undercounter (DEU) Kickplate Adjustment for more information, including custom kickplate installation.
- Finish all sides of the custom panel. They will be visible when the door is open.
A D-style handle is recommended.
- Position the door handle near the edge of the panel opposite the hinge and centered top to bottom.
- Stainless steel tubular and pro handles are available through an authorized Sub-Zero dealer.
Handleless Panel
Designer Series Undercounter Refrigeration Handleless Design
- Can only be achieved using a custom panel.
- Sub-Zero does not endorse any particular handleless design.
- The document above is one example of a design that could be done.
Installation Instructions
Typical panel dimensions are based on an 34 1/2" (876) finished height with 1/8" (3) reveals. Placement of the template must be adjusted for panels exceeding the typical dimensions.
If a template replacement is needed, order part number 7042939.
For Stainless Steel Panels, skip to step 4.
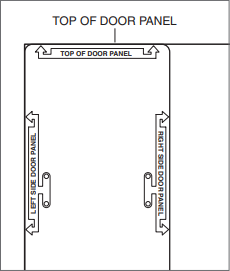
- Place the panel face down on a protected work surface.
- Position the template flush with the top and sides of the panel.
- Verify the correct side of the template is being used, then mark and drill holes.
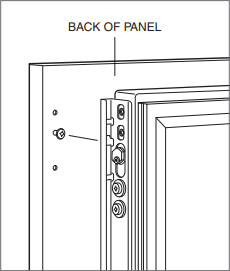
- Use a Torx drive to partially insert a #8 x 1/2" screw into the second hole from the top on each side of the panel. The screws should be approximately 3/16" (4) proud of the panel and will support the weight of the panel during installation.
- Align the support screws on the back of the panel with the slotted holes on both door mounting brackets. Opening the door slightly may help with alignment.
- Once the panel is supported by the screws, partially insert a #8 x 1/2" screw into the second hole from the bottom on each side of the panel, but do not tighten.
- Close the door. Make any necessary adjustments to align the panel and reveals.
- For side-to-side adjustment, move the panel side to side, then install and tighten all mounting screws.
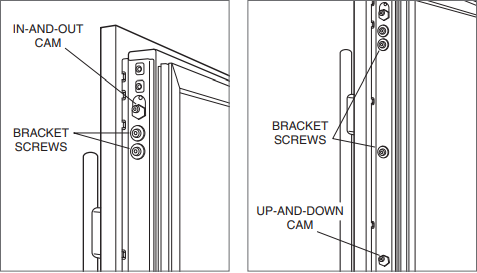
- For up-and-down and in-and-out adjustments, slightly loosen the bracket screws.
- Depending on the level of adjustment required, it may be helpful to loosen all of the bracket screws, which will allow for maximum adjustment.
- Once the bracket screws are loosened, use a wrench to rotate the cams to make adjustments.
- After the adjustments have been made, tighten all bracket screws.
See also:
- Sub-Zero Stainless Steel Door Loose Handle
- Sub-Zero Custom Panel Dimensions
- Change Sub-Zero Glass Door Models to Solid Door
- Designer Undercounter (DEU) Kickplate Removal
Refer to the Designer Installation Guide for more information. Contact a Local Dealer for further sales information. Contact a Factory Certified Parts Distributor to order parts if replacements are needed.
DID THIS ANSWER YOUR QUESTION?

We're standing by with answers
Whether you're shopping for appliances or have questions about those you already own, we've got the resources you need. Talk directly to a customer care expert at the Sub-Zero, Wolf, and Cove service center, or connect with an appliance consultant at an official showroom near you. Get quick answers online, or reach a certified service provider or installer. And much more.
Call us at (800) 222-7820