Wolf Dual Fuel, Induction Range, and Electric Oven Racks and Oven Rack Guides Installation
Topics:
- Install oven racks or oven rack guides in Dual Fuel, IR Induction Range, E Series, L Series, or M Series Ovens
- Install bottom full extension oven rack
- Install easy glide full-extension ball-bearing rack
- Remove an easy glide full-extension ball-bearing rack
Answer:
Dual Fuel, Induction Range, and Electric Ovens, including E Series, L Series, and M Series, have blue porcelain interiors. The following instructions apply to blue porcelain models.
- For information about Gas Ranges, which have black porcelain interiors, refer to Install Oven Racks and Oven Rack Guides for Gas Ranges.
Rack Guides
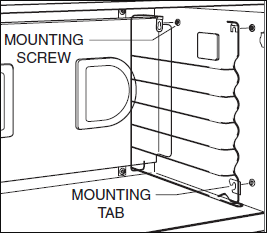
- To insert, find mounting screws on oven side walls, as shown below.
- Place rack guide mounting tabs over the screws and slide down until fully seated.
- White insulation may be visible in the bottom holes the rack guides fit into; this is normal.
- The mounting screws can stay in place during rack guide installation and removal.
- If the rack guide does not fit, make sure the guide is matched to the right location.
- Rack guides are left- and right-side specific. If the guides are switched, the racks will not fit.
- The straight edge of the rack guide faces the rear of the oven and the curved side faces the front.
- Rack guides for a DF48 are different for the small and large ovens. If the racks are too wide in one oven and too narrow in the other oven, swap the rack guides to the other cavity.
Regular Oven Racks
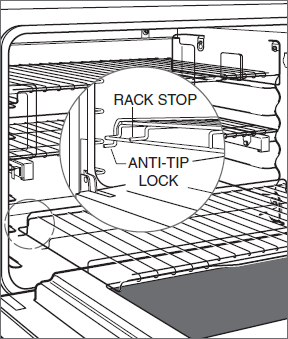
- To insert, place the rack anti-tip lock under side rack guide rails, as shown below.
- Slide rack back and lift up to clear rack stops.
- Continue to slide rack back until completely inside the oven.
- Rack position one is the bottommost location.
- The lowest oven rack has a full-extension capability, which is supported by the oven door (excluding 18" oven).
- The lowest oven rack is angled upwards slightly and only goes in bottom position.
- With the rack in the lowest rack guide position, slide it onto door guides for greater stability and accessibility.
- Verify racks are not upside down or backwards.
- For 48" ovens, both rack guides and racks are oven-specific. Make sure they are installed in the proper sized oven.
- To remove a regular oven rack, pull the rack all the way forward and out of the oven cavity.
Full-Extension Racks
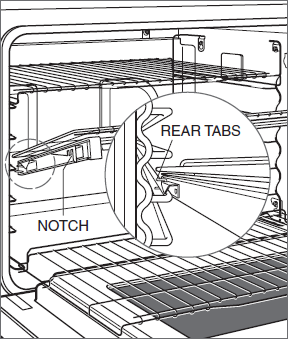
- To insert a full-extension easy glide rack, place the two rear tabs onto the rack guide (one tab above and one below), as shown below.
- This rack can be placed in any rack position except the bottommost rack position.
- Angle the rack slightly and slide back until the front rack notch engages the front rack guide.
- To remove a full-extension easy glide rack, pull the rack all the way forward, then grab the front of the rack and pull up and out.
- Refer to Full-Extension Ball-Bearing (Easy Glide) Rack Information for installation instructions.
Refer to the product Use and Care Guide for further information.
See also, Wolf Oven Rack Position.
Genuine Sub-Zero, Wolf, and Cove parts are available by calling the Factory Certified Parts Distributor in your area. Only filters and cleaners are available for online purchase in the Sub-Zero, Wolf, and Cove Store. Other parts are not available for purchase online. Use Locator to find the Parts Distributor for your area.
DID THIS ANSWER YOUR QUESTION?

We're standing by with answers
Whether you're shopping for appliances or have questions about those you already own, we've got the resources you need. Talk directly to a customer care expert at the Sub-Zero, Wolf, and Cove service center, or connect with an appliance consultant at an official showroom near you. Get quick answers online, or reach a certified service provider or installer. And much more.
Call us at (800) 222-7820